
analysis
US /əˈnælɪsɪs/
UK /əˈnæləsɪs/
- Uncountable Noun
- Careful study to better understand something
B1TOEICMoreas soon as
US /æz sun æz/
UK /æz su:n æz/
- Phrase
- In a short time after (something happens)
- Without any delay; immediately
- Conjunction
- At the moment that, or immediately after.
A1Moreaudio
US /ˈɔ:dioʊ/
UK /ˈɔ:diəʊ/
- Adjective
- Concerning sound
- Uncountable Noun
- Sound, especially when recorded or transmitted.
B2TOEICMoreboundary
US /ˈbaʊndəri, -dri/
UK /'baʊndrɪ/
- Noun
- A division or border to separate two areas
- In sports, a line or marker indicating the edge of the playing area.
B1Morebutton
US /ˈbʌtn/
UK /'bʌtn/
- Noun (Countable/Uncountable)
- Small round piece material used to fasten clothing
- Switch activated by pressing
- Transitive Verb
- To fasten e.g. a shirt, coat
- To suppress or restrain (feelings, etc.).
A2TOEICMorecome over to
US
UK
- Phrasal Verb
- To visit someone's house
A1Morecome up
US /kʌm ʌp/
UK /kʌm ʌp/
- Phrasal Verb
- To come closer to someone; approach
- (Of sun) to rise into the sky in the morning
A1Morecome up to
US
UK
- Phrasal Verb
- To meet expectations
A1Moredashed line
US
UK
- Noun
- A line made up of short dashes, used in technical drawings, maps, etc.
B2Moredo in
US
UK
- Phrasal Verb
- To make completely tired out and exhausted
- To destroy or cause damage to someone
A1Morefile
US /faɪl/
UK /faɪl/
- Noun (Countable/Uncountable)
- Computer document
- Tool used to take off sharp edges from something
- Transitive Verb
- To make something smooth by rubbing it with a tool
- To organize documents by storing them safely
A2TOEICMorefor example
US
UK
- Phrase
- As an illustration or instance.
for free
US /fɔr fri/
UK /fɔ: fri:/
- Phrase
- Without charge; at no cost.
- Adjective
- Available without payment.
A2Morehave to
US /hæv tu/
UK /ˈhæv tə/
- Auxiliary Verb
- Must do
A1Morehear out
US /hɪr aʊt/
UK /hiə aut/
- Phrasal Verb
- To listen to the end of what someone is saying
A1Morein action
US
UK
- Phrase
- Actively doing something; performing a task or duty.
look at
US /lʊk æt/
UK /luk æt/
- Phrasal Verb
- To use your eyes to focus on something
- To focus your eyes on something carefully
A1Moremade to be
US
UK
- Phrase
- Destined or intended for a particular purpose or relationship.
- Designed or constructed with a specific quality or characteristic.
off of
US /ɔf ʌv/
UK /ɔf ɔv/
- Preposition
- From a position on something; down from.
A1Moreoption
US /ˈɑpʃən/
UK /'ɒpʃn/
- Noun (Countable/Uncountable)
- A choice
- A right to buy or sell something at a particular price within a particular period.
A2TOEICMoreout there
US /aʊt ðɛr/
UK /aut ðɛə/
- Adverb
- In or to a place that is far away
- Existing in the universe
- Adjective
- Unconventional; strange; avant-garde
- Existing or available.
A1Moreover to
US
UK
- Preposition
- Used to hand over to someone else to speak
- The responsibility is now yours
right back
US /raɪt bæk/
UK /rait bæk/
- Interjection
- Said when someone says they will return soon, indicating you expect their prompt return.
- Adverb
- Immediately; very soon after going.
A1Moreto the point
US /tu ði pɔɪnt/
UK /tu: ðə pɔint/
- Adjective
- Expressing something directly and without unnecessary detail.
- Phrase
- Relevant and pertinent to the matter at hand.
A2Moreturn to
US /tɚn tu/
UK /tə:n tu:/
- Phrasal Verb
- To go to someone for help, advice, or information.
- To start doing or using something, often something bad or undesirable.
A1Moreup to speed
US /ʌp tu spid/
UK /ʌp tu: spi:d/
- Adjective
- Fully informed; aware of the latest information
used to
US /juzd tu/
UK /ˈju:st tə/
- Adjective
- Did regularly before, but don't do now
- Auxiliary Verb
- Have done before, but do not do now
A1Morevideo
US /ˈvɪdiˌo/
UK /'vɪdɪəʊ/
- Noun (Countable/Uncountable)
- Recording capturing action with sound
- A recording of moving visual images made digitally or on videotape.
- Transitive Verb
- To make a moving film of, with sound
- To make a video call.
A2Morewrite out
US /raɪt aʊt/
UK /rait aut/
- Phrasal Verb
- To write something in full instead of using abbreviations or symbols.
- To copy something by writing it.
A1More
Vocabulary
- used to: Did regularly before, but don't do now
- have to: Must do
- out there: In or to a place that is far away
- up to speed: Fully informed; aware of the latest information
- right back: Said when someone says they will return soon, indicating you expect their prompt return.
- as soon as: In a short time after (something happens)
- look at: To use your eyes to focus on something
- hear out: To listen to the end of what someone is saying
- for example: As an illustration or instance.
- do in: To make completely tired out and exhausted
- turn to: To go to someone for help, advice, or information.
- made to be: Destined or intended for a particular purpose or relationship.
- off of: From a position on something; down from.
- write out: To write something in full instead of using abbreviations or symbols.
- for free: Without charge; at no cost.
- over to: Used to hand over to someone else to speak
- come over to: To visit someone's house
- dashed line: A line made up of short dashes, used in technical drawings, maps, etc.
- come up to: To meet expectations
- to the point: Expressing something directly and without unnecessary detail.
- in action: Actively doing something; performing a task or duty.
- come up: To come closer to someone; approach
- record: Highest or most extreme level achieved
- English: Language of the UK, USA, Nigeria and elsewhere
- word: Unit of language that has a meaning
- option: A choice
- click: To work well with someone or something
- video: Recording capturing action with sound
- button: Small round piece material used to fasten clothing
- boundary: A division or border to separate two areas
- program: To make someone act or think in a certain way
- choose: To select; decide between several possibilities
- audio: Concerning sound
- analysis: Careful study to better understand something
- write: To compose letters and words on paper or a screen
- open: To make accessible or able to be used, e.g. road
- file: Computer document
Get the full experience in the app
Learn anywhere with detailed sentence and usage analysis
01:03
She took a brave step forward, leaving behind her comfort zone to chase her dreams.
Vocabulary
- brave
adj. Having courage
- comfort zone
phr. A familiar situation where one feels safe
Explanation
a brave step is a noun phrase, where brave is an adjective modifying the noun step, meaning "a courageous step".
forward is an adverb modifying step, meaning "ahead".
The whole phrase serves as the object, answering the "what" of took (verb) — she took a brave step forward.
Get the full experience in the app
Look up words anytime with pronunciation, part of speech, and usage
brave
US/brev/
UK/breɪv/
adj.Brave
v.t.To bravely face
A2 Elementary
Get the full experience in the app
Practice speaking anytime and get instant pronunciation feedback
Try this speaking exercise.
Try practicing with this sentence.
80
0
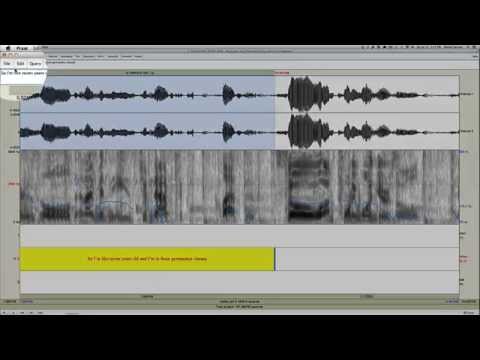
Hhart Budha posted on 2014/06/16Ever feel like you're missing out on what native speakers are *really* saying? This video dives deep into connected speech and shows you exactly how to use Praat for audio annotation and transcription practice, which is super helpful for ESL learners! You'll pick up tons of vocabulary and learn how to break down complex sounds, making your listening skills skyrocket!
Learn this video on the APP!
The VoiceTube App has more in-depth practice for videos!