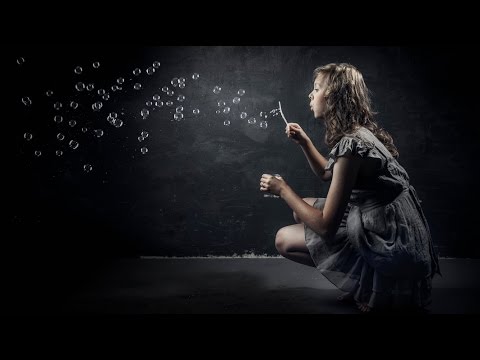
Subtitles section Play video Print subtitles In his video I show you how to use a second light in your home studio to separate your subject from the background. Adorama TV presents Take and Make Great Photography with Gavin Hoey. Where you'll learn how to take stunning photos and in polish them in post-production. Hello I’m Gavin Hoey and your watching Adorama TV brought to you by Adorama the camera store that have everything for us photographers. In this video I'm back inside at my studio as we continue our mini series on working in a small home studio environment. Now in the first part we look at a few ideas that you can do just using one single flash to light your portraits. That's great, but you kinda reach a point where one flashed just isn't quite enough you, need well a second light. Now your second flash doesn't have to be exactly the same as your first one. In fact this is my Streaklight 180 Ws. So this is the smaller, lighter, lower powered and a little bit cheaper version of the Streaklight 360 that I've got hidden away inside this soft box. However you set your lights up adding a second like can really lift your photography and give you loads of creative options. In this video were gonna look at adding a second light as a hair light, a separation light, an accent light, call it what you like. A light just two separate are subject from the background. Speaking of which we could probably do with a subject really. So let's clear this out and set up the shoot. I'm joined in the studio by Freya, give them a little wave Freya. She's gonna be the model for today and the idea is really simple we're gonna get her to blow some bubbles. Were gonna do a profile picture is gonna look fantastic. But before we get to the bubbles which can be a little bit messy we're gonna set the lights. Now to begin with we’ll just use one light, we’ll just use this one here. The other light is switched off, and I'll show you the problem with just one light. Okay Freya can I get you to turn and face the softbox. Lovely and we'll just take a shot here, here we go. So with just one light we get very nice exposure on her face but by the time we get to the back of her head it really disappears into the dark shadows of the background. So to get the hair to separate from the background we need to add in a separation light a second light. So this is our second light here and we’ll just turn it on of course, and then we’ll pop it a little higher, so it comes down from above and lights the top of her hair and her shoulders. Now we can't just put that in place we need to know how bright to set it. So lets takes some meter readings with the flash meter. So we’ll meter off the front here, which has given me F8 as a meter reading on the front but I also need to know how much light is falling on Freya hair. So let's take a meter reading for that light as well, and thats telling me F4. So the hair light is two stops less bright than the front light. Now that might be right, that might be wrong, let's take a test picture and have a little look and see how that goes. Okay so here we go, and as you can see there is a little bit of light on her hair and on her shoulders, it just separates her from the back and a little bit. But we can easily increase the power of that hair light, by well using the remote here, adding an extra stop. So this will be one-stop less light than the key light. And we can increase it again so we can even up the key light and the hair light, and we can even overexpose the hair compared to the background light. So we can increase the amount of light, change the look and feel of the hair like, the accent light simply by increasing its power compared to the key light. What's correct is entirely up to you and it will vary from person to person and hair color to hair color. So I think we want it a little bit less. Let’s go for about a stop less light on the hair compared to the face. Now you'll notice that the background in this shot is black and that is because the this softbox is pointing towards the camera and away from the background. However it wouldn't be a problem if I didn't move the key light so it also hits a little bit of the background as well, and that will put a little bit of detail in the background. Okay lets take the shot. There you go we now have a very small amount of detail in the background. I think that's the look I'm going for. So there we go, that's the light set now all we need is some bubble and let's get blowing. Are you ready? Okay well that was really great fun to do. Freya did fantastically well blowing bubbles. It’s harder than it looks, honestly it really is isn’t it? Okay so let's get our favourite picture into Photoshop and we’ll do a bit of editing and we're gonna do that right now. Don't forget to check out Adorama’s latest contest and your chance to win amazing prizes. Well it was very very brief but did you see me holding this thing here? This is a a bubble machine and there was bubbles streaming out the front. So what we found as the shoot progressed was although Freya was very good at blowing bubbles, I wasn't so good at capturing them. It was just trying to get a along stream of bubbles in a fraction of a second. Actually is quite challenging to do. So were gonna take the the picture of Freya and the picture's of the bubble machine and bring the two together, and using Photoshop its really simple to do. Let's have a look. So this is the picture we want to add the bubbles into and the reason when I wanna add bubbles is pretty clear in this shot. I like everything about the picture except the, well the lack of bubbles I guess. So bubbles, well I got several pictures. I ended up getting the short straw because this was a really messy to do. But this machine blow’s out plenty of bubbles and we photographed them on the black background. Now to get the black background it was simply a matter of turning the the key light the main light away from the background towards the camera. Basically no light hits the background and it goes black. Just like the pictures at the beginning of this video. Now the black background comes in handy in a second but first we need to actually select the bubbles and were just going to get the free hand selection tool and I'll draw around some of the bubbles. Around and back to the beginning and then we'll go to edit and copy, close that down and choose edit and paste. Now that will put the bubbles on a brand new layer and I can put them anywhere I want, but you'll look at that you'll notice that they don't really blend in at all. Well here comes the magic. All we need to do to blend the bubbles in is change the layer blending mode which is currently set to normal, and I'm gonna change it to screen. One of the magic properties of screen blending mode is it takes anything that pure black and makes it well transparent and those bubbles actually looked like they were really, really there and its absolutely fantastic. Okay so that's one set of bubbles, but we got more picture’s of bubble’s so let’s add some more in, why not? Lets get another freehand selection tool and we'll draw around some of these bubbles here maybe, and we’ll copy those and we’ll edit and paste them in and will put them into position, use the move tool. They can come up the top here somewhere. And we'll blend them in with a bit of screen. Then we can go and get some more we’ve got another one here and this one, this one’s got loads of bubbles. So again we'll use the the free hand lasso. Maybe we'll get some more bubbles like that and right around to the beginning. There we go that’s great. We’ll go to edit and copy. Go back to this picture, edit and paste. Lot’s of bubbles now that can go anywhere we like . So we’ll pop them up there. We’ll blend them in with a bit of screen blending mode. So that puts all the bubbles into the picture but remember these are layers, so you can move them around and you can put the bubbles any way you feel is correct and if there are bubble’s that you want to move for example maybe these three down here, you can of course just get the free hand selection tool. Draw around them and then get the move tool, you can drag bubble’s anywhere you like. There we go. Select and deselect so there we are. There is how you can take a picture with very few bubbles and add in as many bubbles as you want to create the final image. Well if you've enjoyed this video and you want to see more videos from myself and the other amazing presenters here on Adorama TV you know what you've got to do? You’ve got to click on the subscribe button. Okay well, something like that. I'm Gavin Hoey, thanks for watching. Do you want great-looking prints at low-cost ? Be sure to visit our easy to use online printing service. Adorama pics has professionals to treat your images with the utmost care that you can count on. For a quick turnaround on photos, cards for albums use adoramapix.com
A2 background freya hair adorama picture gavin Home Studio Essentials Part 5 : Take and Make Great Photos with Gavin Hoey: AdoramaTV 66 6 稲葉白兎 posted on 2014/10/24 More Share Save Report Video vocabulary