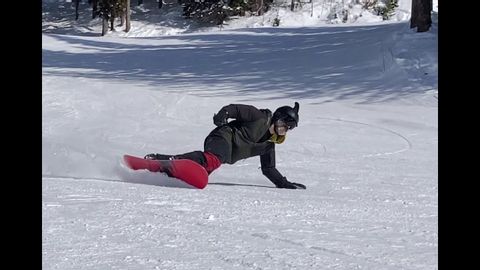
Placeholder Image

Subtitles section Play video

  • Snowboard carving is something of a lost art.

  • I mean, this is how we all rode in the 80s and 90s.

  • Hard boots were common, boards and bindings were generally stiffer, stances were tighter and posi posi was the standard.

  • Now there has been a bit of a resurgence lately.

  • I'm seeing more people riding in this style on wider boards with stiffer interfaces.

  • What I'm not seeing, though, is the expertise.

  • The riders who can consistently carve steep, fast, black diamond runs in soft boots with power and style, leaving only a pencil line track behind them.

  • The knowledge has been lost.

  • No one is doing this anymore.

  • The Europeans and the Russians see more concern with dragging their armpits than perfecting their linked turns.

  • And over in Asia, the riders are jumping around, swinging their arms, spinning, reverting, trying to make green runs look intense.

  • I'm trying to make black runs look easy.

  • I'm chasing the perfect track on some of the steepest groomers anywhere.

  • A lot of this carving technique was developed in the racing community and kept secret.

  • And today, most of the online soft boot instructors who want to teach you to carve can't themselves leave a great track on anything steeper than easy blue.

  • The internet is full of carving tips videos made by people who don't have a clue.

  • This one is different.

  • I'm going to share with you the secrets of soft boot carving right now.

  • This is my own curriculum, assembled through decades of research in collaboration with top riders and further developed through many, many hours of coaching and carefully observing what works for my students in practice.

  • Pay attention.

  • Just a quick tip of the hat to our sponsors, Coroller Snowboards, SkiFabs Board Storage Solutions, Power Ride Boot Stiffeners, Thor Mittens, and Never Summer Industries.

  • Okay, let's do this.

  • There are nine elements to the pencil line carve.

  • We're going to talk about arms, shoulders, obliques, hips, knees, and we're going to talk about the rotation, the compression and decompression, the fore-aft motion, and finally the transition, edge transition.

  • Okay, so let's get to it.

  • Let's start with some nomenclature.

  • Here are some types of snowboard turns differentiated by the turn shape and by the tracks they leave in the snow.

  • The first turn we all learn is the pivot turn.

  • You're just switching edges all the way down the hill, pushing on the snow to control your speed, very basic.

  • Later, when we start to figure out our side cut, our tracks might look a little more like this.

  • This is a slide turn.

  • Half slide, half carve.

  • You'll often see a little pivot in the initiation.

  • It leaves a mid-wide track and an open turn shape.

  • This one here is a euro carve.

  • This is a down-unweighted turn, which means you're going to be fully compressed at the initiation and then fully extended at the apex of these turns.

  • You're often going to see a little chatter in the track as well.

  • It's either going to look like a serrated edge or it's going to look like a discontinuous trench before it pops along.

  • The goal of this turn is to get your body as low as possible to the snow.

  • Unfortunately, in doing that, you are out of position.

  • You are dragging your body, which slows you down, and you're out of position for that pure pencil-line carve.

  • That's why you get the chatter.

  • You get snow down your neck, your mustache gets all wet, and it might look cool to your friends, but it doesn't feel as good as the energy return of the pencil-line carve.

  • The pencil-line carve is the pinnacle of the snowboard turn.

  • The goal here is to make your track as thin as possible, like a pencil line in the snow.

  • As long as your track looks more or less like this, you're doing it, and whatever else you want to do with your body is an expression of your own personal style.

  • Carving is not a competitive sport.

  • There is no judging criteria.

  • Do it however you want, but first learn to make the pencil-line.

  • My personal style aims to minimize the weight I put on any dragging body parts and to make powerful pencil-line carves look easy.

  • The hand.

  • Mostly it's the backhand I'm concerned with.

  • A lot of people who learned how to ride this millennium have this sort of warrior stance.

  • That is not going to work.

  • So we're going to take that backhand that's flailing in the back like a kite, we're going to bring it forward.

  • So we're going to go from this to this.

  • That's all we're going to say about hands for now.

  • We're going to kind of jump back and forth between these nine elements because they're all kind of part of the same motions and the same body positions.

  • The breakdown is just for convenience.

  • Shoulders are next.

  • The number one rule of shoulders is always keep your shoulders level.

  • So we pretend we're carrying a tray for example and whatever you're doing with your board, you have a martini on your tray, do not spill your martini.

  • Do not drop it.

  • The other thing with the shoulders is we're going to actually rotate a lot from our shoulders, but we'll talk about rotation more later and we're going to try to really generate that rotation from our hips, but we're going to keep our hips in line with our shoulders as we do that.

  • So now you're starting to wonder, how am I supposed to lean over and touch the snow and keep my shoulders level?

  • This is where the obliques come in.

  • So on toe side, you're going to drop your knees and keep your upper body stacked and you're going to crunch in the front oblique to actually reach away from the snow.

  • When you start reaching down for the snow, look what happens.

  • My board goes flat, I lose that angulation between the board and the snow and my butt sticks out.

  • I don't have an edge anymore.

  • Edge goes up, oblique gets crunched, lift that inside shoulder up to hold that tray and keep your shoulders level.

  • And then it's the same on the heel side.

  • We want to be in this kind of position, arms in front again, shoulders level, crunching in the rear oblique.

  • Look at some of the commonalities in body positions across these carving sports.

  • Notice how the shoulders are level.

  • The lower body is leaning into the turn while the upper body leans away.

  • There's a reason for this.

  • Now the hips.

  • And I'm afraid here we're going to have to address the elephant in the room.

  • Stance.

  • A lot of you probably don't want to hear this, so just mute the next 45 seconds.

  • Maybe we'll put a little eye candy in the corner for you.

  • Here's the deal.

  • Can you make a heel side pencil line carve on steep terrain in a duck stance?

  • I won't say it's impossible.

  • What I will say is it's much, much more difficult than with a posi posi stance.

  • So I'm going to encourage you to go to at least 12 degrees positive in the back foot and 27 positive in the front.

  • You can go steeper for sure.

  • For me, my boards, my body, my style.

  • When I drop that back foot to nine, I start to chatter on the heel side.

  • I need to have 12 minimum. 27 gives me 15 degrees of splay.

  • I feel that's about appropriate.

  • That's a good all mountain stance.

  • It may feel awkward at first.

  • Now I know what you're thinking because I've heard it before.

  • Oh, but what about my freestyle and my switch riding and blah, blah, blah.

  • Hey, don't worry about it.

  • You have a carving stance on a carving board on a groomer day.

  • And you have a freestyle stance.

  • If you, uh, you know, a duck stance, if you want to ride the park or you want to ride the trees, no problem.

  • I mean, you wouldn't take your downhill mountain bike.

  • You wouldn't use that as a commuter, right?

  • You don't use your all mountain board for carving people.

  • Every manufacturer wants to sell you an all mountain board.

  • Oh, it floats in pow.

  • It rips in trees.

  • It carves the groomers.

  • What that board is going to do.

  • It's going to be bad at everything.

  • Okay.

  • You need a dedicated carving board, dedicated powder board, maybe a freestyle board.

  • If you like, maybe a rock board, maybe a bigger powder board, five boards, quiver of five.

  • That should do it.

  • Um, definitely running posse posse on this.

  • Um, kind of like to get more technical, I would say 15 back foot 30 front.

  • Wow.

  • Okay.

  • Now let's look at our first drill.

  • This is me actually carrying a rope between my hands.

  • Cause I'm not dumb enough to ride with a tray.

  • Okay.

  • But watch out through these turns.

  • I'm focusing on keeping that rope as level as possible.

  • That's the hands are just sort of like an indicator, right?

  • It's the shoulders.

  • You really want to keep level, but the hands help.

  • This one is easy, but crucial.

  • The number one mistake I see in aspiring carvers is that they're reaching for the snow to hold your edge.

  • Your shoulders must be level to keep your shoulders level.

  • You must reach away from the snow, carve deep and let the snow come to you.

  • So we imagine we're holding a tray with a martini and we try not to spill a drop.

  • Use a string as a reminder.

  • We'll also help you keep that backhand from flailing in the over your tail, which is the second most common mistake I see.

  • Now the hips.

  • Okay.

  • So you've got your posi posi stance and now you can rotate your hips forward.

  • Okay.

  • So there's two motions we're going to do with the hips.

  • The one is a rotation and the other is the fore aft motion.

  • Okay.

  • Um, so for rotation, I want your hips.

  • I want your tray out shoulders level directly over the front of your board on heel side and in line with your, this, the angle of your front foot on toe side.

  • Okay.

  • So this board is set to 1530.

  • So that means this rotation from here to here is about 60 degrees.

  • That's it.

  • I want you to keep it in there.

  • I don't want none of this, right?

  • None of this yet over rotation for later.

  • Right?

  • So here you go.

  • Tray's level.

  • Obliques are crunched.

  • Hips are facing forward.

  • That is your heel side position.

  • Uh, tray in line, front hand in line with my front foot.

  • Oblique crunched.

  • Knees will get to shoulders level, right?

  • Reaching away from the snow.

  • Okay.

  • Here's another drill for you.

  • Okay.

  • On the heel side, I want you to touch your back hand to your front knee.

  • And on toe side, I want you to touch your front hand to your front knee.

  • Okay.

  • So this is actually going to put you in exactly the correct amount of rotation on both sides.

  • And it's going to give you extra compression because most people ride too tall to reach their knee.

  • So it's going to get you lower and it's going to get you so, and it's going to get you in the perfect position for rotation.

  • That's the position you want to, you want to find yourself in at the apex.

  • That's the position you want to follow through the, uh, the next 60 degrees through the intense edge pressure part of the turn.

  • Watch how I hold the knee through the entire turn.

  • Aim for this, but start by just touching the front knee on every turn.

  • Feel how that extra rotation tightens up your turns and smooths out the chatter.

  • Okay.

  • Let's talk about the fore-aft motion in a little more detail now.

  • Okay.

  • When we talked about hips, we talked about the bowing forward and then straightening up at the hips to get that forward lean.

  • And then to bring your weight back, you can think about, focus on how much weight is on each foot at different parts of the turn.

  • Some people like to think about the transitions, edge transitions as sort of sliding the board as if you'd slide it under a door.

  • So that takes your weight from the front towards the back.

  • Um, in some ways, it's a very complex motion and there's a lot going on, but when it's done right, there's actually very little motion at all.

  • And the momentum of the turn is actually going to put you in the correct position.

  • So let's first look at the correct position and then I'm going to explain how that all works.

  • So here we have a snowboard.

  • Okay.

  • And I'm going to say, so this is goofy, right?

  • I'm goofy.

  • I'm going to say, right at the, uh, at the transition here, you're pretty much, you're unweighted.

  • So there's not a lot of weight on either foot, but you should be about 50, 50 standing tall.

  • Right?

  • As soon as we start to initiate that heel side, I want you to pressure the board in about that section right there, that point on the board.

  • Okay.

  • As we finish the turn through about to here, well here, but something like this, right at this point, I want that pressure here.

  • Okay.

  • So we start here and it moves down the board to there and the leaning forward, the bowing forward and standing up is going to help you get that weight back through your turn.

  • And our toe side, we're a little shifted back because of course everything is asymmetrical here.

  • Your stance, your body, all of that is asymmetrical.

  • So toe side is going to differ a heel side, of course, in your technique and body position and in the points at which you pressure the board.

  • So on a toe side, let's talk about this point now in the turn.

  • Okay.

  • When you're really starting to lean forward, you're going to bow forward.

  • You're going to put your weight on the front foot.

  • You're going to pressure the board.

  • I'm going to say right in front of the front toes, and then you're going to finish that pressure right in front of the rear toes.

  • So as you move the turn, the pressure moves back along the edge to that point.

  • Now let me explain why you're not actually doing that much work.

  • Okay.

  • So here's an example of some turns.

  • This would be what your track would be.

  • This is the trajectory of your board.

  • If you're carving a pencil line, it means there's no slarving.

  • It means the tail of your board is slarving.

  • But where is your center of mass?

  • Okay.

  • So while I'm in this turn, let's start down here.

  • While I'm in this turn, my center of mass is actually over here.

  • That might be somewhat of an exaggeration.

  • So let's say that's my helmet.

  • Okay.

  • And let's say that's my helmet there too.

  • And again, up here.

  • So what happens here is we get a different kind of arc through that.

  • Okay.

  • So as you come across this transition point, your board actually continues on its trajectory.

  • It's not really doing anything.

  • And guess what?

  • Your center of mass also continues along its trajectory.

  • And this is why it's so important to learn to do the transition in one movement, because it's really quite natural.

  • As you come up here and finish your toe side, you get that weight shift back, you get a little extra rotation, you get that pop and that unweighting, and now your center of mass is coming down the hill and across.

  • So it's just really quite natural to fall into that turn.

  • Your board keeps going across.

  • Center of mass comes down.

  • Now your board is above your center of mass, above your head.

  • This is the sponsorship turn where you can read the logo from the top of the, from higher up on the hill.

  • This takes a long time to master.

  • Absolutely.

  • But this is what it should look like.

  • It should be smooth.

  • In an effort to get there, we start thinking about when to bow, when to stand up, how much weight to put on each foot, and we can use that analogy of sliding the board under the door.

  • Okay.

  • So I learned old school, you know, skater style, knees together.

  • My stance on this board is 57 centimeters.

  • I have some lifting and some canting in the binding, so it helps me get my but that's kind of what you want to go for.

  • Okay.

  • And it's mostly the back knee that people have problems with.

  • A lot of people, especially if you come from a duck stance, are going to be pointing that back knee, the stinky knee, up to nowhere.

  • Okay.

  • You need that knee forward to get the hips forward to get that motion on both sides.

  • The knees go together.

  • Okay.

  • So that's the first motion of the knees, the compression and pulling them together.

  • The next motion of the knees, of course, they're going to help a lot in angulating the board.

  • So to do that, the analogy that's used sometimes is you imagine you have water in your boots, and then when you're ready to initiate your turn, you dump that water out of your boots.

  • So boom, right?

  • Dumping water out.

  • And then a heel side, my knees don't bend that way, but I'm going to get them together, I'm going to face them forward, and I'm going to try to push them to the side here.

  • Okay.

  • As much as I can, compensating this, bowing like that.

  • Okay.

  • So those are the five body parts.

  • Now we're into the four elements of motions.

  • Okay.

  • And I think before we get here, we might go to the blackboard to look at some parts of a turn for reference.

  • Let's look at a couple of turns in more detail.

  • So I've marked this, zero degrees is where your turn would start, 90 degrees is the apex, 180 is the end.

  • And I've marked these other sections here, 20 degrees into the turn, and 160 means basically 20 degrees back from the end of the last turn. 160 here.

  • Okay.

  • So this area is the finish.

  • This whole area really is the initiation.

  • But when we talk about all that stuff that's happening in the finitiation, it's basically this 40 degrees, which doesn't seem like much, but because you're not really rotating much in this 40 degrees, it's actually about a third of your turn or more.

  • Okay.

  • So what's happening in here?

  • Let's look at this area first.

  • Okay.

  • So we know at zero degrees, we are unweighted, we are decompressed, standing tall, very little weight on the board.

  • We're in a neutral position.

  • Okay.

  • But by the apex, we want to be maximally compressed.

  • We want to be maximally rotated, and we want to be maximally forward.

  • So between here and here, all of that has got to happen.

  • That rotation, that compression, the bow and the knees bent.

  • And yeah, the bow gives you that forward forward lean as well, leaning into the front of the board as we discussed.

  • So then from the apex to 160, this section of the turn here is the patience part of the turn.

  • Here, I just want you to hold that position, find your rotation, your compression, your forward lean, and just hold onto it and let the board carve.

  • Let it come around.

  • Keep your shoulders level, always to every part of the turn, but particularly through here.

  • Yeah.

  • And then we're back to the finish of the turn, where we're going to start to lean further back on our back foot, straighten out from the hips, put some more weight on the back foot.

  • We're going to stand up, we're going to decompress, sorry, we're going to unrotate, basically unwind.

  • Okay.

  • And I'm going to kick this board up a little bit to unweight.

  • Now let's look at this section here a little bit.

  • Okay.

  • After the unweighting, immediately after this moment, you're immediately starting to compress and rotate and put your body weight downhill a little bit.

  • So your center of mass might be something like this at this point in the turn.

  • As you're compressing, okay, remember you're unweighted, you're hopping a little bit, and now you're bending your knees.

  • This gives you time to settle your edge into the snow, pick your line, get your balance on top of that edge.

  • As you come down onto it, as you're bending your knees, it means very little pressure is on that and that makes it easy to settle it into the snow, get it up, angulate the board, and then continue through this section, adding rotation, adding compression, adding forward lean until you hit the apex, and then you just hold it.

  • Hold it, focus on keeping your shoulders level, be patient, wait for it to come around.

  • Once the edge pressure drops, you're starting to head across the hill, now you can lean back, you can give a little kick of rotation if you want to just get the extra unweighting, or you can start to unwind immediately, but patience.

  • Patience is key through this section.

  • So this is your turns, okay, closed turn shape, perfect Cs, 180 degrees each one.

  • So we're going to talk about the top here where we start at zero degrees, that's 90 in the apex of the turn, 180 at the bottom, which of course also is zero degrees for your next turn.

  • Okay, so let's talk about that in terms of rotation.

  • At zero degrees, while you're transitioning edges, you want to be pretty neutral, okay, you're going to be unweighted, standing tall, pretty neutral.

  • At the apex of the turn is when you want to be maximally rotated.

  • So, and I told you already, maximum rotation for heel side is with the hands, the shoulders, everything facing the front of the board, and on toe side, everything is in line with your front foot.

  • There's your 60 degrees of rotation, so at the apex of the turn, you're fully rotated.

  • At the zero mark, the finitiation, as we call it, you're more neutral and standing taller.

  • Okay, the compression will be the same, actually, so when you're at 90 degrees at the apex of your turn is when you find maximum compression and minimum compression at the zero at the finitiation.

  • It's actually kind of the same with the fore-aft motion, okay, so at the zero, you're pretty much standing neutral, you don't have a lot of weight on the ground, because you're kind of popping into the next turn, okay, so you're pretty much straight over both feet 50-50, okay.

  • Now, in that first 20 degrees is when all your weight actually comes forward.

  • This is the dive, this is the commitment, this is what they call the sponsorship turn, so if you're above me watching me carve, you're going to be able to the logo on the bottom of my board when I'm below you, okay, that's a lot of commitment, I'm getting up on this edge, I'm throwing my body downhill and waiting for the board to catch up.

  • So, most of this fore-aft motion happens like in the last 20 degrees from 160 to 180, and then in the first 20, from zero to 20, okay, so you're going to end the turn kind of on the lean forward, kind of while you're unweighted, you lean forward, so once you get to 20 degrees, you're maybe 60% forward already, and you can keep going forward right to the apex, so at the apex of the turn at 90 degrees, you are maximally rotated, you are maximally forward, and you are maximally compressed, right, and then from that apex for the next 30, 40, 50 degrees, depending on how fast you're going, how steep it is, this is the patience part of the turn, this is the part where you do almost nothing, I think you actually could be adding a hair of rotation and you could be decompressing a little bit, but really the force of the turn, the edge pressure is going to push into you, so you don't really have to be standing up, but you will have to be resisting that pressure, so you're kind of pushing, you're kind of maybe rotating towards the end of the turn a little bit more, but mostly this section of the turn, okay, from the apex down until the edge pressure drops again and you're heading across the hill, that's the patience part, this is the part where we just hold the position, so let's look again at the position, okay, toe side first, your knees are dropped, your shoulders are level, you're reaching away from the snow by crunching in the obliques, your hips and shoulders are pretty much in line with your front foot, and that's it, and I'm going to just hold that, and now I can maybe rotate a little more as I end the turn to help it come around faster and maybe be pushing a little bit, heel side, okay, now my hips, my shoulders are facing the front of the board, shoulders are level, hands in front, crunching the rear oblique, right, hips, knees, everything, you can think about the knees, particularly on heel side, like a biker, like a motorbike might take on a race course and just drag his knee on the inside of the turn, right, you really want to throw them down, okay, now the the finitiation, this is the most challenging part, I see a lot of people who can make a nice carve, but they're pivoting in the initiation, we want to do this without any pivot at all, we want to just change edges, I think we're going to go back to the blackboard here to discuss it for a moment, okay, let's look a little more closely at the bow, now I've prepared this little video for you to watch just a few turns in succession, so you can, and it just exaggerates the bow forward and the straightening up, this is not a drill, I do not recommend anybody try to mimic this or ride like this, it's quite dangerous, you see my legs are quite straight, I'm leaning way too far, it's just an example, so you can just isolate the bow from all the rest of the movements, okay, so you'll see if you watch these turns, when I go down on heel side, I'm putting my hand down right about here, when I bow down on heels, so that's where my hand is touching the ground immediately, as I begin, as I begin to initiate my turn, and then on toe side, I'm going to put my hand down right about here, just in front of my toes, okay, so everything again is shifted off, but just watch that, how I lean down and lean up, watch how it tightens up my turn, watch how putting my weight so far forward really makes the board dig in and come around fast, keeps my speed down, keeps my track thin, don't try this.

  • So, let's look at the timing of this again, okay, at zero, we're just, we're standing tall and in a relatively neutral position, okay, and immediately, as soon as I get past zero, I start to fall downhill, I start to rotate into my heel side, I start to bend those, drop those knees in, right, crunching the oblique, all this stuff.

  • Till I'm getting real low at 90 degrees, okay, and then it's the patient's turn, I'm resisting, resisting, resisting, pushing slightly, maybe right at the end, before you change the edges, it's nice to push off the back foot, just to get a little kick and help you with the unweighting.

  • Here again, on toe side, okay, so at the apex, I am at my maximum compression, I'm in line with my front foot, my shoulders are level, my oblique is crunched, my hips, my shoulders are all basically facing right past my front knee, and patience, just let the board come around, okay, start way on the side of the run, so you know you have space, do your head check, make sure no one's coming, and just wait, just wait, the board will carve and you will slow down, that's the intense part of the turn, just past 90s, when the edge pressure really wants to spike.

  • Your job is to keep that edge pressure even by elongating that turn, by being patient and waiting, waiting, if you push too hard, you spike the edge pressure, and boom, you're chattering, you're out, okay, so yeah, we try to keep that edge pressure, flatten the curve, as they say, right, keep it from spiking too high, when you get those spikes, that's when you have chatter, every board will just have a maximum amount of edge pressure that it can handle before it's um, yeah, some are super low, and they're good for green runs, some are really high, very stiff, good for black runs, but everything has its maximum, and also, you can extend that maximum by having perfect body position, perfect timing, so, uh, we're going to talk now for a few minutes about the finitiation, okay, this is, as I said, the most complicated part, I think we're going to go back to the blackboard here for a moment, just to talk, just to see the different trajectories of your board and your center of mass, but what's going to happen here, I'm going to, let's say, I'm just in the last, last 10 or so degrees of a toe side turn, okay, so I can add a hair more rotation, just to, just to help me with the unweighting in the transition at zero, and I can push off my back foot a little bit, just to get a little more, a little more pressure in the tail to help me, um, turn uphill a hair more, okay, then you get the unweighting, then immediately the rotation starts, the compression starts, and, uh, you're going down, and this, as you compress, that means the edge pressure is very, very light, this gives you a chance to just fiddle that edge right where you want it into the snow, you should have picked your line already by now, but look for the clean corduroy, um, and then on heel side, it's the same thing, as I finish my turn, I'm going to go just a little bit back, kick that board up, um, decompress to get a little bit of a jump, right, and then that's going to help me back through my neutral position all the way over, so this is kind of like what it's going to look like, something like that, um, so I want to mention a few other things here, on my heel side turn, when I'm at the apex, in the patience part of the turn, I want to have the pressure on my board focused just in front of my front heel, okay, that's where I'm pressuring the board, so my weight's more on my front leg, I'm pushing hard, I'm leaning forward, pressure is right, right here, okay, on toe side, the, the pressure on the board is actually focused just in front of the back toes, and that turn is going to be more on the back foot, you're still going to start kind of centered, you don't want all your pressure on the back foot, but feel that, as you go, as you push off toe side, you're pushing off your back toes, as you push off heel side, you're pushing off the side of the front foot, the heel, and, and pressuring the board just in that section, right in front of the heel.

  • Our third drill is basically just a compression decompression drill, in this clip, what I'm doing is I'm just exaggerating that motion, I'm standing extra tall through the transitions and getting extra low through the apex, so I want you to see that timing work, this is called an up unweighted turn, because as we come through the, the transition, we're standing tall, our body mass is up, there is another turn called the down unweighted turn, where everything is just about the same, except the timing of the compression is opposite, so you're actually compressing through the transition, I don't want you to do this yet, this is more of a euro curve turn, I call it the safety turn, because when it gets icy, when there's a big roller I have to accommodate in my transition, something like that, that's when I'm going to use that turn, it's for another video.

  • Turns out that if you're already touching the knee on every turn, and then you exaggerate the compression, your outside hand is already very close to the snow, so rotate a hair more and touch the snow with both hands, now your friends are impressed.

  • Also note that this is a production Never Summer Westbound DF, an all-mountain board, it may be wider than yours, but this style can be replicated on any wide production board.

  • Okay, now you're trying these drills, you're making progress, but it's not quite working for you, right?

  • So let's look at some troubleshooting possibilities, these I common things that I've already mentioned, but you can just focus on that for a few turns, and maybe find that body position to make your board hook up better.

  • First one, track analysis.

  • Look at your tracks, okay, the goal here in the pencil line turn is to make your track as thin as possible.

  • Of course, in softer snow it's going to be a little wider, but for whatever the conditions are, for whatever your board is, aim to get that track narrower.

  • Look back at your tracks now, every time you stop, just look at your tracks, you can tell where you're dragging your toes, where you're dragging your bindings, is the heel cup making a mark, where did you touch down, where did you lift up, was there chatter, can you tell anything from your track?

  • Are your toe sides and your heel side symmetrical?

  • These are just some examples, but it's worth looking at.

  • Next thing is stance angles, okay, if you're trying to do this in a duck stance, you're going to have problems on heel side.

  • Even Jeremy Jones rides posi posi on his carving boards on groomer days.

  • You got to try it, okay, bring that back leg in, it might feel awkward at first, I went 12 in the back foot, 27 in the front, start from there.

  • Now, maybe you're booting out, maybe your tracks are super wide, and you can see your toes, and you can see your heel cup, and you're ending up on your on your ass, because your board is not wide enough.

  • So a dedicated carving board should be wider let's, I would say, start with maybe two centimeters wider at the waist than your mondo boot size, mondo point boot size.

  • When you get better, and you start carving steeper stuff, and going faster, you're going to need wider than that even.

  • Another thing you can do without buying new gear, is you can stiffen up your boots, and you can stiffen up your bindings.

  • These things help a lot, that's the subject for another video, but the interface should pretty much correspond with the board.

  • If you have a soft board, soft bindings, and soft boots are okay for slow speed cars.

  • You want to pick it up, you want to go faster, you're going to need a longer stiffer board with more effective edge, and probably less side cut, like a higher side cut radius.

  • You're going to want a stiffer binding, and you're going to need clam shelling.

  • It's something I see a lot of people do, particularly on toe side.

  • Okay, that's when I'm bending my body over.

  • I told you to bow, but you keep the shoulders level, right?

  • And the butt's over the back, right?

  • I told you to bow forward, that's fine.

  • Clam shelling is when you're sticking your butt out, and you're reaching down for the snow.

  • Look, my shoulders are out of alignment, my board goes flat, right?

  • So remember that.

  • Keep those shoulders level, that's the number one trick, the number one tip I give to about 80% of aspiring carvers.

  • Keep those shoulders level, always.

  • And the last one is just have patience.

  • Find that position, get into that position by the apex, and just wait, just wait.

  • Nobody's coming, you got the whole run to yourself, just let the board come around.

  • Once you start to feel that, now you can start maybe harder, over-rotating, whatever you want to do to make it come around faster and really feel that energy return.

  • But for now, find that position, be patient.

  • Yes.

  • Next tip, back to the hand again.

  • Yeah, I see a lot of people just flailing that back hand there.

  • Always your money, bring that back hand forward, athletic position, forward, forward, okay?

  • Arms, shoulder, everything, hips, everything comes forward.

  • You're not going to do a heelside carve in this position, not on a black diamond at least, and not without chatter.

  • Compress more.

  • That's my personal mantra.

  • When things get tough, when they get icy or steep or narrow, whatever, I remind myself, if you compress enough, you can ride anything.

  • And I'm talking like right down to the board, okay?

  • Where you can touch your foot, you can even grab the board through the turn if you want to, all the way down, all the way up.

  • You don't want to go to the limit of your compression, you got to leave a little bit there, okay?

  • But this is not too low for a hard turn, a hard steep turn.

  • And all the way up again in the transition.

  • Don't stick your butt out, it's kind of the same as clamshelling, I see a lot of people doing that, right?

  • You want your butt over your high back, you can compress enough even to almost touch the high back with your butt.

  • Don't stick your butt out, none of that clamshelling, reaching for the snow.

  • In terms of the transition, a tip I give to a lot of people is to change edges earlier, initiate earlier.

  • I see a lot of people come through that turn and then do, you know, maybe a 15-20 degree pivot before they start carving the next turn.

  • Racers do this too, this is how they're taught, but that is not how you do a pencil line carve, okay?

  • The transition is one motion, okay?

  • So if you have to elongate it over the course of a hill, that's fine, you can do it very slowly, but it's one motion.

  • You need your momentum off of that kick to fall into the next turn.

  • My first turn from a stop position is always a little bit shaky.

  • Once I get the rhythm after one turn, then it's no problem.

  • Well, that's pretty much it.

  • If you want to get good at carving snowboards, it's going to take a lot of practice.

  • Expect about one year to get competent, expect two to three years to get good at it.

  • A few final suggestions, invest in high quality equipment, number one.

  • Number two, train your core, okay?

  • Your legs can be as strong as they want.

  • If your core is jello, it's not going to do you any good.

  • You need a strong core to absorb all those bumps and imperfections to smooth out that turn and make it look easy.

  • That's where you need the muscle, not here.

  • Some final tips on safety.

  • When you are dragging your hands, most of these drills on green runs, I don't want you to be touching the snow at all, except if you're falling over to help yourself to get yourself back right and get your shoulders level again.

  • When you start to get on steeper slopes, blues and blacks, you are going to be dragging your hands.

  • What you want to avoid is dragging your hand back here, sticking your fingers out, too easy for a little rut or a little mogul to rip your shoulder off, either side.

  • What I actually want you to do is reach your elbow for the snow, wear mittens, make a fist, and then you can push down with the outside of your hand there or there.

  • That's much, much safer than doing this or this, where you're really in a risky position.

  • Safety tip number two, learn to do your head checks.

  • You got to look uphill once in a while, depending on how busy your run is and how wide it is and not expecting you to go back and forth across the hill.

  • Yes, you have the right of way, but everybody wants to avoid a collision.

  • Do your head checks, save some room at the sides of the run, so if someone does need to pass you, there's room there.

  • Just remember, these skiers are completely oblivious to snowboarders anyway, but in general, when they see a snowboarder in their peripheral zooming off down the hill, they don't think again.

  • That snowboarder is gone.

  • They're not going to see them again.

  • You're going to make a 180 degree turn and come right back at them, so it's up to you to anticipate that and be safe.

  • Now, of course, the required plug.

  • You want to see more videos, you know what to do.

  • Like, share, subscribe, right?

  • These videos are actually a lot of work and it's my pleasure to share my knowledge.

  • Make it worth my while.

  • That's all I'm asking.

  • Takes very little time, costs you nothing.

  • I'm also available for private coaching, either virtually or in person.

  • You can find me on email, jamescherry at gmail.com, j-a-m-e-s-c-h-e-r-r-y at gmail.com, and yeah, have fun, be safe, no slarving.

  • Thank you.

Snowboard carving is something of a lost art.

Subtitles and vocabulary

Click the word to look it up Click the word to find further inforamtion about it

B1 US

The Secrets of Snowboard Carving: Part 1 - The Nine Elements

  • 0 0
    niniba posted on 2024/10/25
Video vocabulary