
at the top of the tree
US /ət ðə ˈtɑp əv ðə ˈtri/
UK /ət ðə ˈtɒp əv ðə ˈtri:/
- other
- Being in the highest or most successful position in a hierarchy.
B2Morebow out
US /bo aʊt/
UK /bəu aut/
- Phrasal Verb
- To decide not to do something; back out
A2Morebrush
US /brʌʃ/
UK /brʌʃ/
- Verb (Transitive/Intransitive)
- To touch against a thing very lightly when moving
- To clean, paint, or apply something with a brush
- Noun (Countable/Uncountable)
- Quick and gentle movement
- Thing with hairs used to apply paint, etc.
A2Moreclose up
US /kloz ʌp/
UK /kləuz ʌp/
- Countable Noun
- A photograph or film shot taken of a subject at close range.
- Adverb
- To move nearer to someone or something.
A1Moredown the middle
US
UK
- Phrase
- In or along the center of something.
- (In baseball) directly over the center of home plate.
- Adjective
- Taking a neutral or moderate position; avoiding extremes.
fill in
US /fɪl ɪn/
UK /fil in/
- Phrasal Verb
- To put earth in e.g. a hole
- To explain the context so that someone understands
- Verb (Transitive/Intransitive)
- To write or type information in a blank space.
- To temporarily do someone else's job.
A1Morefor best
US /fɚ best/
UK /fə best/
- other
- An expression meaning ‘it is better to’ or ‘to do something for the best outcome’.
B2Morein red
US /ɪn rɛd/
UK /in red/
- Phrase
- Marked or written using the colour red.
- Adjective
- Operating at a financial loss; in debt.
move on
US /muv ɑn/
UK /mu:v ɔn/
- Phrasal Verb
- To decide to change or go to a different place
- To start talking about something different.
A1Morenail
US /nel/
UK /neɪl/
- Countable Noun
- Pointed piece of metal used to join pieces of wood
- Hard part at the end of your finger
- Transitive Verb
- To attach things together with metal nails
- To catch someone doing an illegal activity
B1Moreof course
US /ʌv kɔː(r)s/
UK /ɔv kɔː(r)s/
- Adverb
- Sure ; Certainly
- Phrase
- For sure; certainly
A2Moreon the table
US /ɑn ði ˈtebəl/
UK /ɔn ðə ˈteibl/
- Phrase
- Located on the surface of a table.
- Available for consideration or discussion.
A1Moreon to
US /ɑn tu/
UK /ɔn tu:/
- Preposition
- Toward something; forward
- Aware of someone's activities.
- Adjective
- Aware of someone's deception or illegal activities.
A1Moreoutline
US /ˈaʊtˌlaɪn/
UK /ˈaʊtlaɪn/
- Noun (Countable/Uncountable)
- Line around the outer edge of something
- A summary of the important points of a plan, etc.
- Transitive Verb
- To draw around the outer edges of something
- To summarize the important points of a plan, etc.
A2Morepolish
US /ˈpɑlɪʃ/
UK /'pɒlɪʃ/
- Uncountable Noun
- Act of making something clean and shiny
- A cream used to make shoes etc. shiny
- Transitive Verb
- To make something smooth and shiny by rubbing it
- To make something smooth and shiny by rubbing it
B1Morestripe
US /straɪp/
UK /straɪp/
- Noun
- Strip of alternating color in straight lines
B1Morethumbs up
US
UK
- Noun
- A gesture of approval or agreement, indicated by holding a fist with the thumb extended upwards.
- A positive rating or vote on social media or online platforms.
- Noun (plural)
- Multiple gestures of approval or agreement made by extending the thumbs upward.
A1Moretogether with
US /təˈɡɛðɚ wɪð/
UK /təˈɡeðə wið/
- Preposition
- In addition to; along with.
- Including; as well as.
A1Moretool
US /tul/
UK /tu:l/
- Noun (Countable/Uncountable)
- Device used to make things, e.g. a hammer
- Something used to achieve an aim or carry out a particular function.
- Transitive Verb
- To provide a workshop with the right equipment
A2TOEICMore
Vocabulary
- on to: Toward something; forward
- on the table: Located on the surface of a table.
- thumbs up: A gesture of approval or agreement, indicated by holding a fist with the thumb extended upwards.
- at the top of the tree: Being in the highest or most successful position in a hierarchy.
- move on: To decide to change or go to a different place
- together with: In addition to; along with.
- down the middle: In or along the center of something.
- fill in: To put earth in e.g. a hole
- for best: An expression meaning ‘it is better to’ or ‘to do something for the best outcome’.
- close up: A photograph or film shot taken of a subject at close range.
- bow out: To decide not to do something; back out
- in red: Marked or written using the colour red.
- of course: Sure ; Certainly
- line: Border that divides two places or regions
- fill: To make something full
- nail: Pointed piece of metal used to join pieces of wood
- design: To plan in a particular way to fulfill a purpose
- add: To include as well
- white: Person's name
- paint: To make a picture with colored liquids
- outline: Line around the outer edge of something
- circle: A perfectly round shape
- brush: To touch against a thing very lightly when moving
- polish: Act of making something clean and shiny
- stripe: Strip of alternating color in straight lines
- thin: Flowing with ease; with a high percentage of water
- black: To fill in something to make it a very dark color
- tool: Device used to make things, e.g. a hammer
Get the full experience in the app
Learn anywhere with detailed sentence and usage analysis
01:03
She took a brave step forward, leaving behind her comfort zone to chase her dreams.
Vocabulary
- brave
adj. Having courage
- comfort zone
phr. A familiar situation where one feels safe
Explanation
a brave step is a noun phrase, where brave is an adjective modifying the noun step, meaning "a courageous step".
forward is an adverb modifying step, meaning "ahead".
The whole phrase serves as the object, answering the "what" of took (verb) — she took a brave step forward.
Get the full experience in the app
Look up words anytime with pronunciation, part of speech, and usage
brave
US/brev/
UK/breɪv/
adj.Brave
v.t.To bravely face
A2 Elementary
Get the full experience in the app
Practice speaking anytime and get instant pronunciation feedback
Try this speaking exercise.
Try practicing with this sentence.
80
0
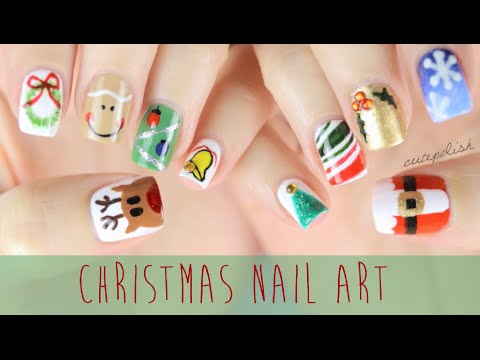
稲葉白兎 posted on 2015/01/17Get ready to deck your nails for the holidays with this ultimate Christmas nail art guide! You'll learn 10 super cute designs, from ombre techniques to dazzling rhinestone accents, perfect for making your fingertips festive. Plus, you'll pick up tons of specific vocabulary related to nail art tools and techniques along the way!
Learn this video on the APP!
The VoiceTube App has more in-depth practice for videos!