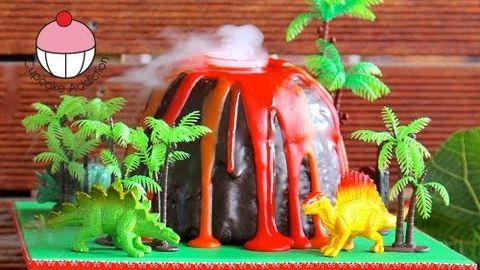
Subtitles section Play video
Hello and welcome to Cupcake Addiction's Volcano Cake Tutorial where I'll be showing you how
to make this great, smoking volcano cake using your giant cupcake mold.
If you follow my channel, My Cupcake Addiction, you'll know that I love to show you how to
make not only giant cupcakes but heaps of different things using your giant cupcake
mold. I'm a big fan of many users for the one [pen].
So tools and equipment that we will be using today:
Mine's going to be for dinosaur party so I've actually made mine as part of a great, big,
dinosaur, volcano cupcake tower. So I've got some little plastic dinosaurs.
Now I've picked this up in a pack. They came with all of these trees and it's a really
common place at the children. In Australia, I bough mine in K-Mart for 15 dollars and
for 15 dollars I got, I think, 200 pieces, and more than I could ever use. So the birthday
boy is going to get a lot of extras when we're finished with this cake.
I've got myself a square cake board. I'll leave details of the size of this cake board.
And look, it's really going to depend on how many dinosaur and how much of a setting you
want to put around it. I've iced mine with a bit of green icing so some green fondant.
And I do have a whole tutorial on my channel that shows you how to ice and fondant a board.
So I will leave a link to that in the description box below. And I've just got mine on a little
cake decorating turntable today for ease. I've got my giant cupcake which has been baked.
We do have a whole series on how to get your giant cupcake or baked and out of its little
cupcake liner. I've used a mud cake today because I want a really heavy-duty cake for
this volcano. We're going to be coring out the center of it. if you use something like
a mud, it's quite a dense cake and it's going to hold its shape a lot better than if you
use, say, a sponge. I've got those on a cooling rack.
And I've got a couple of trays. Now this is just going to be the catcher of our mess today.
I've got a circular cookie-cutter. I've got some of our dark chocolate ganache.
And I've also got some white chocolate ganache. I will leave all of the ingredients for these
recipes in the description box below. We have a whole tutorial for the dark chocolate ganache.
For the white chocolate ganache, I've made the recipe as per the instructions below.
Then I've halfed it and I've colored half red and half orange. You can use any food
coloring you like. It can be liquid, paste, gel, powder. It really doesn't matter for
ganache. I've got a small serrated edge knife.
I've got a big serrated edge knife or a bread knife.
I've got just a smooth edge or a butter knife. I've got some scissors.
I've got a couple of zip lock bags. And for our smoke effect, I've got just a
little plastic shot glass. You can also use a little candle (Inaudible 02:32), or anything
glass, plastic, it doesn't matter. And I've got just a little new medicine dropper.
These are any about a dollar for us down at the local pharmacy.
You're also going to need a little bit of dried ice. Now, initially I thought, dried
ice: what a pain, where am I going to find it from? I got dry ice pellets for 8 dollars
a kilo, which is so much more than I am ever going to use. It lasts for a few days so long
as you keep it airtight. It doesn't need to be stored in the freezer, so long as it's
in an airtight container and it gives us that brilliant smoky effect.
So let's get started. Now the first thing that we want to do is
we want to carve up our giant cupcake. So you can see there's going to be quite a bit
of mess. We'll pull our rack out here and pop that off to the side. I want to try and
catch some of my mess so there's not as much cleaning for me to do as we get through this
tutorial. So you want to make sure that you've got a
nice, flat bottom on the base of your cupcake, you can see there as it's risen, [for] it's
drying on its face or cooling on its head, I guess. So it's flattened down quite a bit.
But you really want to cut it along, sort of along this line with the ripples because
you want that to be the base. So you might go just a touch underneath that. We'll have
a little bit of a ganache circle. So as I cut that, I'm actually going to turn
the cupcake around. That will give me a really nice, even cut. Fingers crossed. And look,
for your volcano, it doesn't matter if it's not a 100% even or a 100% level because it's
a volcano, it's a mountain so it's not technically supposed to be perfect. It going to be just
a little bit there that I need to trim off and there's my nice, flat base, ready to go.
Turn that over. You're looking at the bottom half of your volcano. We'll pop that just
down there. This is going to go with some of my leftover ganaches for dinosaur cakepops
to go with my extravagant dinosaur desert table for my son's birthday.
So you want your top here. Now you're going to take the top and I'm going to cut along.
So I'm holding it here but you'll notice I'm not actually at risk of cutting myself. I'm
just going to hold it because I'm holding underneath where the knife is going. And once
again, I'm turning. You'll see how beautifully the mud cake cuts in comparison to, say, a
sponge cake. Alright, so now you want to just position
that on top. And what you can see there is a little bit of overhang. So it's kind of
looking a little bit like a mushroom now. We want to trim that over hang off. But be
warned, this little bit overhang can be a little bit crumbly because it's quite firm
because of the different cooking spray and the cooking oil that we've used. So I like
to get my smallest serrated edge knife. The other thing we want to do is want to cut
off these little ridges that are common with giant cupcake cases. So to begin with, I'm
just going to run my knife around being really careful not to cut yourself there. So I'm
going to run my knife around and just smooth them out. It's just going to look a little
bit unusual if you've got a big volcano that's got kind of these perfect circular ridges
on the top. So you don't have to be perfect about getting them out. So once you've gone
around your first layer, just position it on top. So you've got there sort of nicely
sized. The only thing that I do want to do is just grade down that edge a little bit
because it's just looking a little bit like it kind of drops down a bit too neatly there.
So leaving that on top of that giant cupcake. I'll pop it back in my tray just so I can
once again store the mess. I'm just going to go around this like this, just by eye.
And just shave it down. Alright, now for our volcano, we want to take
the top off. So I'm just going to cut straight across the top. Have a look at your circle
cutter. And once again, this might change depending on how big you want your volcano,
I guess, hole to be. But I don't want to take too much off the top there because I do want
to try and retain a nice top to my volcano. So that's about the same size as my circle
cutter. You want to go a little bit bigger because you need that flat ridge to come out
about a centimeter all the way around your circle cutter. So I'm going to just go down
another centimeter and cut it again. You can see how many cakepops we're going to get out
of all these cut off. That is perfect. So this is going to be where out lava sits and
it's all going to come over the top of our volcano. We'll just do a little bit of tidy
up and we'll come back and we're ready to get decorating.
Alright, so we've cleaned up a lot of that mess. Now take your nice, neat top and make
sure that you sit it down. I'm just going to sit it behind me exactly in the same direction
because we've trimmed it pretty well perfectly the size. You don't want to be turning it
around here. Take your circle cookie cutter and right in
the middle there, push down. Leave it sticking out just about a millimeter so just a fraction,
fraction of an inch and give it a twist. Now this is the great thing again about mud cake,
as you twist it, you can actually see that cake is now twisting in that little core and
pull it out. You don't want to go all the way to the bottom of the cake. This is going
to be where our hidden lava is. So when I actually cut the cake, lava is going to flow
out of the center of the cake which is going to be visually spectacular. But you don't
want to cut all the way down to the bottom or your lava is going to seep out underneath
your giant cupcake. So you really need that cake there to catch it.
So now for the top cake, once again in the middle. You just want to push that cookie
cutter through and I'm going to push that all the way down because that's quite a thin
piece. Lift it up and push all the way through. So you can see there, I'm actually pushing
it all the way through. And then we'll push that cookie cutter out.
So take your knife, we're going to take a little bit of that chocolate ganache and just
moisten the top here with a little bit of ganache. That's just going to be a delicious
glue. And then we'll stick our volcano top back on. Perfect. Now we can see a volcano
starting. Now what you want to do here and it does get a little bit messy, hence the
tray and the cooling rack underneath, is we're just going to scoop this ganache on and just
cover the outside of this volcano. You could leave it raw like that. It still does look
very volcano-like. But you don't want to expose the cake to the air. It's going to dry out
really quickly. So this ganache is going to seal that cake and make sure that it's going
to last couple of days. So you don't have to be frantically making it on the morning
of your child's party. So you can see there I'm just going to use
my knife and I'm just going to start at the top and just, almost just let it fall down
or drizzle down. Don't worry too much about the rim of the volcano because that's going
to have our lava ganache in it anyway. And I'm just going to smooth it over until that
covers the whole thing. Alright, so you've got your volcano there and that ganache is
still really wet and quite sticky. So if you'd leave that for an hour or so that ganache
is going to start to firm up. And when you do actually serve this cake, it's not going
to be that wet and sticky. It's going to be quite firm. It will actually almost solidify
a little bit around the outside of that cake. So it's time now to apply our cake to our
board. So we want to take our cake board. You want to take just a little bit of chocolate
ganache and this is going to glue the cake to the board. Pop it in the center. And then,
using that knife, we're going to lift the cake off the try using the knife. You can
also use a pellet knife or [you might even] use a bread knife for this just because it's
a little bit longer. So I'm just going to slide it underneath the cake. Once again,
my cake, a lot more stable than if it was a sponge. And don't worry if you're moving
a little bit of that ganache around. I'm actually going to stabilize it by just putting my fingers
in the larva hole, transferring it. I'm going to take my other knife and I'm just going
to push that up against the cake as I pull this knife out. Beautiful. A seamless transfer.
So we're ready... We're getting to the point at the end of our volcano tutorial now. You
can see it's really starting to take shape. So what you want to do here is take your zip
lock bags and we're going to put some of our red and some of our orange ganache in each
one. So one's going to have red and one's going to have orange. Make sure that you let
any air out of that bag before you seal it up.
Alright, so from here, you can probably guess what we're going to do. We want to just cut
the corner off your zip lock bag. So just make sure that you're not doing it over the
cake. Just cut off a corner. It doesn't have to be particularly fine. So I'm going to cut
off quite a chunky corner there. Make sure you know where your little piece of plastic
has gone and pick it up as soon as you can. You don't want to risk that plastic going
into one of the cakes that you're making or any part of the cake you're making, especially
not when it's a kid's cake, actually when it's anyone's cake.
Same again with the orange. Alright, now for the lava, I like to hold
them both together and spin as I'm going. And then turn them around. Beautiful. Once
you get to about that full, SO about 2/3 of the way full, take your toothpick. And remember
we want this to be visually spectacular when we cut it. Take your toothpick and just give
it a little, kind of a little stir. But don't stir it too much than you combine the 2 colors.
You really just want to marble them. Now, what I would suggest here is keeping
some of that ganache and applying these last little bits just before the party. So if you're
going to make the cake the day before, make it to this stage the day before and then you
can add all of your little figurines and all the other bits and pieces, and then leave
just before you're going to bring the cake out for the party. Before your guests are
going to arrive, come in and finish filling and do your final effects so that it looks
like really, nice, fresh lava. And that way, particularly if you're going to do the dry
ice technique, that way your ganache is going to be really really nice and easy for you
to put your shot glass into. So I'm going to serve this cake on a day and
I'm not going to put my dried ice in my shot glass in until we're ready to serve and sing
"Happy Birthday". The cake is going to look absolutely gorgeous. And then when I want
to... I guess it's going to look a little bit different once we put that shot glass
in. It's going to be obviously a shot glass sitting in the top of it. So we'll take the
cake away, put it in the dry ice, bring it back, smoking candles in it, singing "Happy
Birthday", and everyone will be amazed. To finish this cake off, I will finish it
off for you today. So what we're going to do is... taking your... Actually, I might
use the orange ganache first. I always prefer to have more of the red than the orange. I
think that lava is typically more red than orange.
So I'm just going to take it and out over the side. Nice big globs of lava going out
over the side, all the way around. Now taking your red... And this is... It really
does start to get messy. Like I said, I like to have a little bit more of the red. So taking
your red, over, sort of in those gaps. And don't be afraid to kind of go over and then
over a bit again so you get that really nice dribbly effect. I will also mention with this,
you don't want your ganache to come all the way up to the top of that crater. You want
it to be just below when it's all finished. And if you can, you really, you want it to
be sort of pulling it at the bottom of the volcano there. It just adds a really nice
effect to it. So if you're finding that your ganache anywhere
is not going all the way down, you need a few more kind of bits of it around the bottom.
Just do a nice, big, thick, blob on top and it will just naturally kind of ooze down that
way. Now take your toothpick again and give it
a little stir. And then you just want to just push some out over the top. So it kind of
almost have to spoonful of... It would have been a little bit better here. Just push it
out over the top and just give it a really nice, big, marbled glob over the front there.
Stir it around. Make sure that you've got that marbled effect happening. So I think
I need just a touch more orange in there. Put a little blob of orange on top. And give
it a little swirl. Alright, so to stick down our dinosaurs, I'm
going to use that ganache as just a glue. You can also use melted chocolate depending
on how far you want to transport that. But this ganache is going to set quite nicely
anyway. So I'm going to take my trees first. And I'm
just going to put a little bit of any colored ganache on them. It doesn't really matter.
And I'm just going to place them around my volcano. So at this stage, if you have perhaps
spilled any little bits of crumb or you got any mess on your board, this is a great great
way to cover it up. Add in a few trees and add in a few dinosaurs in anywhere that's
not perfect, suddenly becomes perfect. With your dinosaurs, just put a tiny little
bit of ganache on each of their feet. You really don't need much and they're going to
come off the board really easily if you use ganache. You'll just be able to pick them
up for you. If you use chocolate, they will kind of require a little bit of prompting
to get them off of the board. Stegosaurus. Alright, so
I'm happy that's all looking pretty dinosaur-y. Now, it's time for our finale. I've got here
my dried ice. So I'm going to take that dried ice and I'm going to submerge it into that
nice melted lava, just push it down. So you want to push it down. And then you can see
why here I decided not to do this, like at the very very beginning when the cake first
goes out because you can actually tell if there's a bit of shot glass in the middle
with dried ice in it. So it's not ideal for the whole day but certainly for the main event.
So I've got some hot water, just tap hot water, and I've also got my little medicine dropper.
And you just want to take 4 or 5, just depending on the size of your medicine dropper, 4 or
5 to that warm water and pop it in there. And there goes your smoking volcano.
So there you've got your fantastic smoking volcano. I hope that you've enjoyed watching
this tutorial as much as I've enjoyed making it for you today. And make sure that you head
on over to our channel for lots more great dinosaur tutorials. Thanks very much for watching.