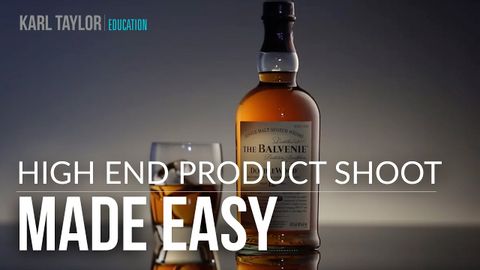
Subtitles section Play video
Hi, I’m Karl Taylor,
and I’ve got less than ten minutes
to convince you
how good our Pro training stuff really is.
So, what I’m going to do is
show you through a
professional-level product shoot here.
And, show you all step-by-step, all completely free.
Just to give you an insight onto
our knowledge and what we can do for you.
So, let’s take a look at the set-up.
And we’ll break it down, show you the lighting,
show you how we make a shot like this work.
And, hopefully you’ll be able to take away something
from this that will give you
a better insight to this type of photography
which is often considered quite difficult.
Because liquids, bottles, glass product photography
can be quite a difficult shooting scenario.
But I’m going to break it down into some simple
step-by-step sequences for you.
So, let’s take a look at the set.
I’ve got a sheet of black ‘Perspex’ as my base;
sometimes called acrylic, ‘Melamine’, different things.
This is a glossy black plastic, basically.
It’s commonly used in product photography,
a lot of jewelry photography, liquids, bottles.
Here, I’m using it because it gives a beautiful reflection
of the product.
It’s a very classy look, and classy feel to the product.
I’ve got one light here at the moment,
which is just putting a light onto the label of the bottle.
You can see the shadow from my fingers there
on the bottle.
We’ll come back to that in a little bit more detail shortly.
On the background here, if you come around this side,
I’ve got a light on my background,
which is creating a gentle glow.
It looks quite harsh at the moment
because the modeling light is on full power,
but this is creating a gentle glow
on the background just to give us a little bit of
light above our horizon
at the back edge of the picture, OK?
Now, my depth-of-field for this shot
is only going to run the depth of the whiskey bottle,
to make sure the bottle and the label are sharp.
I’m going to keep the glass out of focus.
Now, some other key things on the back here
are some reflector cut-out panels.
If you have a look at these things,
you can see that I’ve got some
bits of card—gold foil card—that I’m using,
carefully positioned, behind the liquids
to bounce the light from my main light sources on this side
through the liquids
to give them a lovely, rich glow,
to bring the product to life.
Let’s go back around the other side
to look at the main lighting.
So, if we look on this side,
you’ll see I’ve got two soft boxes.
I’ve got two, thin, strip-light-type soft boxes.
One of them you can see here at the front
is a little bit further away from my trace,
and the other one is a little bit closer.
Now, the tracing paper
is used to diffuse my soft boxes even further,
because I don’t want to get
a really harsh strip-light on the bottle.
I want a lovely, graduated soft light,
and the reason I’ve got two of these lights
is so that I can get one light as an edge light down the bottle,
and one as a general light on the bottle.
So, what we’re going to do is
we’re going to film through another camera
to allow you to see what each light is doing on the bottle
so you can fully understand
the lighting set-up that we’ve got here.
We’re also going to film the result of what those reflectors do
that are behind the glass and the whiskey bottle,
so you can appreciate how important they are to the shot.
And we are going to get a really stunning image out of this,
and this set-up will show you how easy it is.
Now, you might be thinking, “Well, actually, I don’t have,
necessarily, this particular type of soft box.
I’m not using fancy studio lighting like this.”
Well, interestingly, these particular soft boxes by Broncolor,
these have a speed ring adapter,
so you can attach a strobe or normal flash gun
to this type of soft box to shine it through.
So, you could create most of this set-up
even with a pretty basic lighting.
Oh, there’s one other thing we need to look at.
Just come around this side.
You’ll see, as well as the two soft boxes here,
I’ve got this piece of black card.
And, if you have a look here,
this black card is shielding this soft box,
so that I’m not getting any light spill
from this soft box hitting my background.
Because, if I take this away,
you’ll see when we look through the other camera,
the light that would hit the background and spoil the shot.
So, let’s take a look at each of these lights and what each of them are doing.
OK, forgot to mention before about the ice in the glass:
fake ice
This is an acrylic ice cube.
These are readily available from most studio suppliers.
So, I’ve got a couple of those fake ice cubes.
Obvious reason: doesn’t melt,
won’t cause us any problems, stays where we need it to stay.
So, let’s start looking at what’s happening on this bottle.
What I want to do is break it all down,
and then put it all back,
so you can see exactly what’s going on.
So, Fabian is going to take these lights out,
so what I’d like you to do, Fabian, is
take the two soft boxes out completely.
You can leave them switched on,
because we just need a bit of light
so we can see what we’re doing.
Just take them out.
OK, so we’re left now with a piece of trace,
and you can see a light on the bottle.
Now, that light on the bottle is
from this light that I spoke about earlier.
This is just a little projection light
that allows you to pinpoint a specific area or a light.
Now, this is a projection light with a lens in it,
which allows me to focus the light,
or de-focus it, so I’ve softened it slightly.
And, it’s got what’s called “gobos,” which are little adjusters,
which allow me to
reduce the size or the box of the light
to a specific size that I choose.
Now, you could use a snoot,
you could use something a little bit more simpler,
a little bit more cost-efficient,
but this is particularly useful for product photography work,
for highlighting little details and labels.
You’ll also notice now
that the illumination through the liquid has completely disappeared,
because Fabian has taken away our main lighting,
which was hitting the reflectors behind the liquids
and bouncing through them.
So, now that main lighting is gone,
we’ve lost that effect.
Now, we’ve got the tracing paper
attached to a big c-stand with a big rod going over the top
for that roll to hang from.
We’re gonna take that out, as well, to start with,
but at the moment we’ve got this attached,
which is just a shield to stop the lights hitting the back.
Just a piece of card, gonna take that out, as well.
We’ll put that back in in a minute.
So, what I want to demonstrate…
actually, we won’t take this out, we’ll just spin this,
just to make it a little bit easier.
So, I’m just going to spin that out of the way.
Is that getting clear past that light?
Because, what I want you to see
is how nasty the light would be
if we weren’t using the trace.
So, Fab, if I could get you to take that soft box,
and put it into,
yeah, around about here, just so you can see.
Now, look at the lighting on that label,
or on the bottle.
Sorry, just my filter gels had fallen off from the back here.
If you look at the lighting on the bottle now,
you’ll see we’ve got this harsh, horrible block of light.
And, this is a common mistake made
when people try to illuminate glassware or bottles,
is using this very defined, rectangular light
that doesn’t gradate away,
and that’s the reason for the tracing paper,
is to create a gradation of light.
So, we definitely don’t want that.
That demonstrates that we need the tracing paper
to give the effect that I wan to achieve on this bottle.
So, let’s take that light out, Fab.
Now, we’ll put the tracing paper back in.
So, it’s just a roll of tracing paper that we’ve doubled up.
Just going to spin that back into position.
And, if we look at the bottle,
as Fabian now introduces the backlight into position,
watch what happens to the bottle.
Stop there, Fab.
So, you’ve got a lovely soft light already starting to create there,
but this light is to create an edge light on the bottle,
so that we just get a nice light down one edge of the bottle,
to separate it from the background.
So, if you push it into position now, please, Fabian,
you’ll see that light become a little bit stronger,
and create a lovely line down the edge of our bottle.
And, what I want you to do now, Fabian,
to just flick that light on and off for a second,
so they can see the effect of it.
That’s it, back on again.
And now, just pull it out further away,
so they can see the shape of the light
change based on the distance.
There you go, so you can see that light enlarging.
And, then, slide the light over towards this direction,
so you can see how it will wrap around the bottle
and light the bottle differently on each time.
So, we’re gonna put that light back into its correct position,
and that will give us the edge light.
Now, the problem that we’ve got from that light, at the moment,
is that we will get some of that light
spilling onto our background,
because that light, and I can see that light here,
and a lot of that light is going to come
and hit my dark gray background,
which is going to ruin the shot,
because I want to just control the light on the background
with this background light here.
So, that’s why we bring in the card.
So, this black card is going to attach to our c-stand
to create what we call a “flag,”
to stop any light from getting through onto our background,
which we certainly don’t want.
And, that, basically, is it
just attaching a piece of card to act as a shield
to stop the light coming through onto the background.
Then, moving on from that,
we’re going to bring the main light in now.
So, this is the main fill light on the bottle.
You can see that lovely extra light that’s just come in on the bottle there, now.
And, if you push that light in really close, Fabian
you can watch it change quite dramatically
the harshness of the light as it comes through the trace.
You can still see it’s got that lovely, soft diffusion from the trace,
but it has become harsher as it’s got closer to the trace.
This time, take it right back, please, Fabian.
There you go, you see it change again,
and then bring it back into its correct position.
So, that’s the positioning on my lights,
the key lights for the bottle.
You’ve seen the light for the label.
And then, my final light is
this light that is on the background.
So, I’ve just got a glow of light
running over the background, here.
And, this glow of light, we can attach different gels onto it.
So, I’ve just got a couple of neutral density gels,
but if you wanted to change the glow of light on the background
to be an orange or a red,
just attach one of those gels over the light.
It’s as simple as that.
In this instance, I’m going to stick with the ordinary gray background
with a glow of light radiating up
and then graduating out to a dark gray.
Now, the other key elements are these reflectors, these two reflectors.
We’ve got a couple of reflectors behind the bottles, OK
and what you need to see is how they affect the shot.
So, hopefully, through camera now,
you will be able to see,
as I turn these,
you’ll be able to see
how they are affecting the light coming through the liquids.
So, you have to be quite careful with these,
quite specific to cut them
to the right size to suit the bottle, to suit the shape,
so that you don’t see them behind the bottle.
And, that’s the key point,
is so that they reflect the light through the bottle,
but you don’t see them behind the bottle.
So, you do it, spend a little bit of time cutting these out
and figuring the shape correctly.
And then, you’re basically bouncing light from your main light source
into that reflector, through the liquid,
to create the lovely glow through the liquid.
Now, I’m not sure if I’ve got that correctly positioned.
You’ll notice we’ve got one other little bit of reflector card
taped to the back of the bottle,
and that’s because I needed to get the light
through the neck of the bottle just right,
and this reflector wasn’t doing it quite rightly,
so we just attached another reflector on the back of it.
And, that’s about it.
The rest of it is down to the positioning of your liquids,
where your horizon line is,
and then your depth of field.
I’ve got the camera almost ready in position,
which I’m then going to shoot the shot,
and we’re ready to go.
One other point to mention is,
this side of the bottle
does not have any light on it,
because we’ve got no light source coming from this side,
only the two main lights from there.
So, just to catch a little bit of an edge light,
I will take an additional shot with this reflector card in,
just to pick up a little bit of light down the neck of the bottle,
and then I’ll use that image to comp into the main shot to finish it off,
because the camera’s not moving,
the product’s not moving,
so it’s going to be very simple just to take that additional shot to comp that in.
Now, ideally, I’d love to take the shot all in one go,
but I would have to position this card
quite a way out of shot,
because I’m taking this shot in a landscape version, and in doing so,
it would be too far away to give enough illumination.
So, I’m gonna have to do this just as a two-shot set-up.
So, one shot will be there, then the main shot,
and the two will be joined together.
So, it just needs to slide over towards the tracing paper, please.
That’s it, perfect.
There you go, so now it’s hidden.
The one behind the glass, I think needs to slide a little bit more, as well.
And back a bit towards you just to hide it.
Sorry, keep going, keep going, keep going,
and just rotate it a little bit.
Yeah, there we go, that should do it,
we’ve got a nice glint through there.
And, then, if you can turn the background light on again.
And, that creates our background light over our horizon.
And, that’s basically it.
So, yes, if you had to start from scratch,
setting this up is a little more complex,
does take a bit of time.
But, you can see, in actual fact, this isn’t magic, you know?
This is just, basically, physics, science, mixed with a bit of art.
And, by overcoming the problems of lighting by creative solutions,
you can achieve great results.
And that’s what our training really offers,
is we go very in-depth,
showing you exactly how to achieve these type of shots,
and far more complex pictures.
So, I’m gonna get started taking this shot,
you can see the result,
and hopefully, that’s given you a good insight into
what Karl Taylor Photography can do for you.
OK, that’s great, thank you.
Closed Captioning by www.theaccessproject.photography