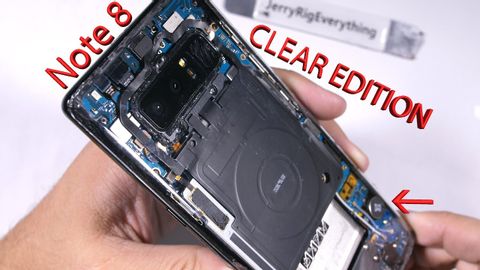
Subtitles section Play video
Before I start showing how I made my clear Galaxy Note 8, it's important to note that
I highly recommend not attempting this project yourself.
So many things can go wrong during this project.
I'll try to mention most of them, but still, it's an expensive phone so don't try this
unless you have nothing to lose.
Alright, now that we have that out of the way, let's get started.
[Intro]
The Galaxy Note 8 is a beast of a device, and just like how most high-end gaming PCs
are see-through, I think Samsung should offer a clear version to show off their top of the
line components.
It would be cool if Apple did it too - mediocre hardware is still interesting to look at.
I just like clear gadgets.
The Note 8 has Gorilla Glass 5 on the back that is glued to the frame of the phone.
I'm pretty sure they use some new kind of adhesive this year because I had an extraordinarily
hard time removing this back panel.
The phone is turned off at this point and I'm warming up the phone until it's too hot
to touch comfortably with my hands.
Then I'll slip a thin metal pry tool along the side edge of the glass panel since that's
the only entry point I could find.
Then gently cut away the adhesive under the glass with that metal edge.
Remember, we are working with glass, so any pressure in the wrong spot and the whole panel
shatters.
It's a delicate process.
I'll try and link the replacement back glass panels in the description as soon as they
are available, in case yours gets broken or is already broken and you just need to swap
it out.
As the phone cools, the adhesive hardens back up again.
I'll be reheating the phone with my heat gun about every 30 seconds or so.
Tucking a sturdy piece of paper or business card under the glass also helps it keep from
re-adhering to the phone again.
I told you, this is a very painstaking process - Samsung doesn't mess around with their water-proofing.
Finally my back panel lifts up and away from the phone exposing some of the plastic shrouds
protecting the internal components.
I'll do a full tear down of this phone, talking about the components and the OIS and the cameras
in a future video.
One thing I did mess up though was the fingerprint scanner ribbon cable.
I managed to slice through that with one of my pry tools.
I wasn't planning on using it anyway, but still, I'll try to avoid doing that in the
future.
The bottom of the phone, over the charging port, has 6 regular Philips head screws holding
down the plastic.
I'll just set those off to the side to keep them organized.
And I'll have a tool kit linked in the description that fits these screws.
The top plastics and wireless charging have 10 more screws – the same Philips head screws
we saw at the bottom.
It's good practice to lay these out in a way that they go back in the same hole they came
from.
The wireless charging panel unclips from the metal frame of the phone at this point and
we can see the golden contact pads on the back that transfer the power from the copper
coiled inductor to the battery.
I'm going to leave my wireless charging intact this time around and I'll explain more how
I do that in a second.
The bottom plastics of the phone snap off exposing the charging port and headphone jack.
Things are starting to look how we want at this point.
The loudspeaker's built into the bottom plastics.
It's got that water-damage indicator on it.
I do want a speaker in my finished phone so I'll cut off the un-mandetory part of the
plastic, leaving the speaker and golden contact pads intact with a few of the screw holes
so it can reattach.
Perfect.
The battery has some separation foam on the back that I'm going to remove.
And now we look at the wireless charging itself.
The wireless charging has one little niblet up at the top that is a battery temperature
sensor.
This is excruciatingly important.
Without this niblet, your phone will not charge.
So this needs to be left intact.
Personally, I'm just going to cut around the golden contact pads leaving everything intact
but the plastic.
I want all the features to remain functional in this build.
I left one screw hole next to the contact pads to hold everything in place.
But, if you look closely, you can see the leads under the black stuff that go from the
battery temperature sensor niblet to the motherboard.
So if you are anti-wireless charging you can just cut around those leads, leaving them
intact like I did with my clear Galaxy S8.
But, if you mess up that niblet, your phone will never charge again.
My phone is turning on at this point and still functional.
So, so far so good.
Plus it can still charge, which means I didn't damage that battery temperature sensor.
Now for the back panel itself.
The super strong adhesive that Samsung placed around the outside edge needs to come off.
The glass is curved along both sides and it's glass, so I'm being super careful with it.
Once all the sticky adhesive is gone I can start removing the color.
Using the metal pry tool scrapes off the color, but it leaves a slightly cloudy laminate layer
underneath, above the glass.
This would still look cool since it's kind of like that frosted effect that the older
Game Boy colors had, but I want my phone to end up completely clear.
The laminate layer is extremely adhered to the phone and does not want to come off on
it's own.
I'll use some heat to remove the camera lens, it has a metal frame, so as long as I don't
put any pressure on the glass part of the lens it will come out in one piece.
This premium stripper will hopefully help soften the bond between the laminate layer
and the glass.
I'll spray the foam over the back panel and let it sit for about 15 minutes.
It really helps if you have chemically resistant gloves at this point.
You can tell that the stripper started eating through my fingertips on my gloves, so I just
rinsed it off and kept going.
Once I got a large enough piece of the laminate lifted up, it just peeled away from the glass
back entirely.
But now, if the glass breaks in the future, it'll fall away in large chunks instead of
being held together by that laminate.
You win some and you lose some.
I'm going to de-brand my phone at this point by removing the logos from the underside of
the glass.
They just scrape off.
I'll get my clear double-sided tape around every edge of the phone.
This is probably a good time to mention that any time you open up a water-resistant phone,
it will 100% not be water-resistant anymore when you put it back together.
So this project definitely has it's own pros and cons.
The tape all around the edge should keep dust out, but I wouldn't trust it around water.
My back glass panel is clean at this point.
A bit of glass cleaner got rid of all the fingerprints, and then the camera lens with
it's sliced fingerprint scanner ribbon, gets put back into place.
And the whole back panel can get set on the phone.
Now, I might be a bit biased, but I think this looks awesome, and this is without Samsung
even trying.
They could take 2 seconds and design the internals to be viewed from the outside and it would
probably look even cooler.
Like the black insulation over the copper wireless charging coils.
It can be scraped away like I showed in the video I did with What's Inside.
If Samsung used clear insulation around those copper coils, it would take the aesthetics
to a whole new level.
I did put my SIM card into the phone and got 4G signals, texts and phone calls all worked.
And even WiFi and Bluetooth were still functioning.
So everything's working as it should.
You can see both camera units, the iris scanner and front cameras, the s-pen holster, the
loudspeaker, circular vibrator motor, and wireless charging pad itself, with, of course,
the charging port down south next to the headphone jack.
So what do you think?
Should Samsung give us a clear phone option?
Maybe if there are enough comments asking for it below this video, Samsung will consider
it.
Share this video with someone you could see rocking a clear phone like this one.
Thanks a ton for watching, and I'll see you around.